Setting up WebSDK and Adobe Analytics with core components tracking and consent handling

In the digital world, understanding how users interact with your website is critical, and Adobe Analytics is a great tool for doing this. However, setting it up with Adobe Experience Manager core component tracking and user consent management can seem complex. This article aims to simplify the process using Adobe's WebSDK and the Tags data collection tool (previously called Launch).
We'll start with the basics, setting up report suites, and then move on to configuring the Experience Platform event schema. Next, we'll create datastreams to collect data and send it to analytics. Special attention will be given to core component tracking and managing user consent to ensure privacy compliance.
Whether you're an experienced user or new to Adobe Analytics, this guide provides a straightforward path to a solid analytics setup. Let's get started with the prerequisites!
Table of content:
- Requirements and setting up a report suite
- Setting up Experience Platform Event Schema
- Datastream Creation
- Setting up WebSDK and within AEM
- Consent handling
Requirements and setting up a report suite
Before you begin configuring Adobe Analytics using the Adobe WebSDK, it's important to ensure that you meet the requirements and perform the initial setup correctly. This section walks you through the requirements and steps to set up a report suite within Adobe Analytics.
Prerequisites: Make sure you have administrative access to both Adobe Experience Platform Data Collection and Adobe Analytics. This access can be assigned to your user profile in the Admin Console. If you don't have access, contact your system administrator.
Setting Up Report Suite:
Adobe Analytics organizes the data it collects into structures known as Report Suites. Here's how you can set up a Report Suite:
-
Accessing Report Suites in Adobe Analytics:
- Log in to your Adobe Analytics account.
- Navigate to Admin from the top menu, then All Admin > Report Suites.
-
Creating a Report Suite:
- Once in the Report Suites interface, look for the option to create a new Report Suite or manage existing ones.
- Follow the on-screen prompts to create a new Report Suite. This will involve specifying a name for the Report Suite and other necessary details as prompted.
-
Setting Up Props for Core Component Events:
-
After setting up a Report Suite, the next step is to create props (short for properties) for core component events which are essentially custom traffic variables that can be used to capture and analyze data that is specific to your business requirements.
-
Navigate to your Report Suite under Admin and select Edit Traffic > Traffic Variables.
-
Here, define prop1 as Component Type and prop2 as Component Title.
- prop1 (Component Type): This prop will hold information regarding the type of component that is interacting or generating the event.
- prop2 (Component Title): This prop will hold the title or name of the component.
-
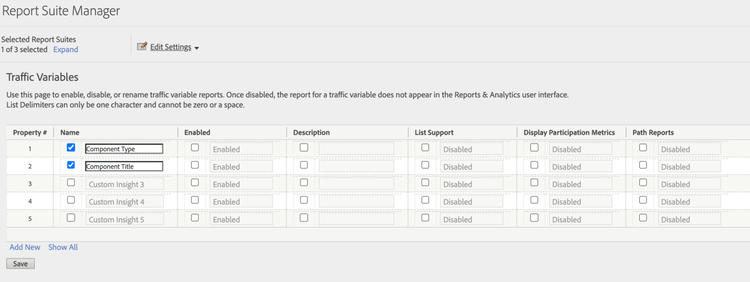
With these steps, the basic configuration within Adobe Analytics is complete. The props defined will help in categorizing and analyzing the event data based on the type and title of the components involved.
The subsequent step would be to set up a proper workspace which facilitates the organization and analysis of your data. Check here how to set up a Workspace.
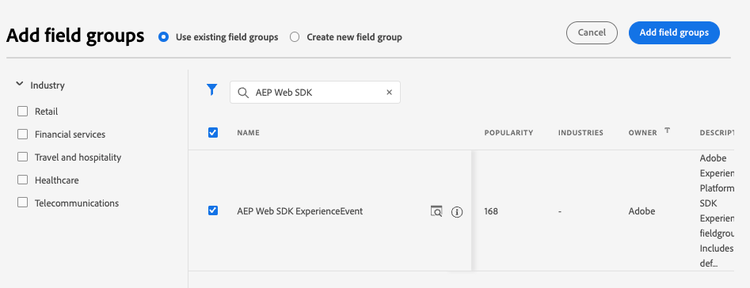
Setting up Experience Platform Event Schema
To ingest data from the WebSDK, we need to add an additional new field group that provides all the necessary fields. So click on Add Field Group and search for AEP Web SDK, select the field group and add it. Now save the schema.
Datastreams
Next we need to create a datastream within the Experience Platform. A datastream is basically an endpoint where we can post XDM and it will do something with the data and send it to one or more consumers. In this case, the WebSDK will post all the necessary data to the defined datastream, which will hold the previously created schema, and then forward that data to the analytics.
The Adobe Analytics integration within the datastream maps alot of properties by default. So for our case no further manual mapping is required. If you would like to track custom events then you need to adjust the mapping and map the incoming XDM-Field to the Event-Schema-Field. A detailed list of which attributes are mapped by default can be found here: Analytics variable mapping in Adobe Experience Edge
Creating a Datastream
Navigate to the Data Streams tab in the Data Collection and click New Data Stream. Enter a name and description and select the previously created schema.

To ensure compliance, you must enable full IP obfuscation in the advanced settings. Once you have saved, you will be able to add services to your data stream.
Select Adobe Analytics and add the report suite you created in step one.
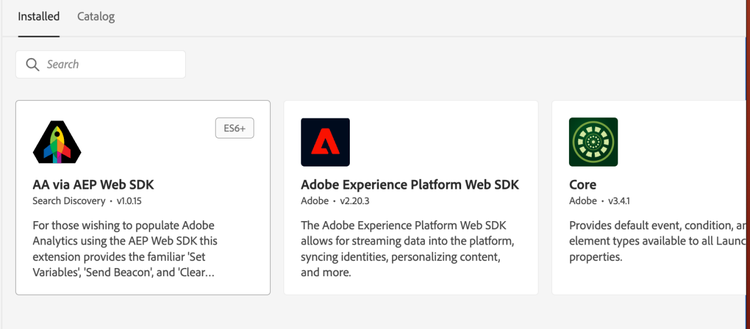
Implement WebSDK via Tags
The final piece of the puzzle is to implement the WebSDK using the Data Collection tool Tags. Navigate to the Tags tab within Data Collection, click New Property and specify a name and domain. The WebSDK is an extension that you can install from the catalogue. You can also add the great companion extension AA via the AEP Web SDK which will make our lives a lot easier.
Adobe Experience Platform Web SDK Configuration
Data Streams
Select the previously created datastream for development, staging and production datastreams.
Data Privacy
To enable proper consent management you need to select out or pending. pending will queue all events in memory and only send data when consent is given. out will not send any data to the datastream and all events will be discarded before consent is given. - We will select pending as this will ensure that all events such as the initial page view will be sent to the datastream after consent has been given.
We can leave all other settings at default.
AA via AEP Web SDK
Does not require any inital configuration.
Data Elements
Now that we have all the extensions set up, we can go ahead and create some Data Elements.
The first element we need to create is the Component Title. Create a new element, select Custom Code and add the following code:
if (event && event.component && event.component.hasOwnProperty('dc:title')) {
     return event.component['dc:title'];
 }
As a second element we will create the Component Type. For this element add the following code:
if (event && event.component && event.component.hasOwnProperty('@type')) {
     return event.component['@type'];
 }
Third we create an element that will provide the path name / the full path of the current page.
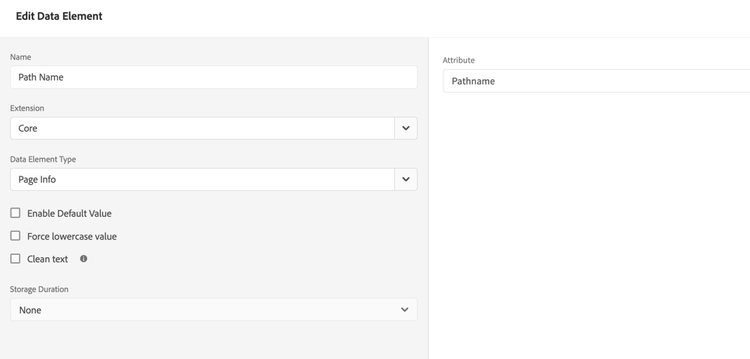
With the Elements create we can now create the final rules.
Rule: Page Loaded
For events create a custom code event and name it Page Loaded. Add the following code:
/* jshint esversion: 11 */ // allow optional chaining

 //set the namespace to avoid a potential race condition
 window.adobeDataLayer = window.adobeDataLayer || [];
 //push the event listener for cmp:show into the data layer
 window.adobeDataLayer.push(function (dl) {
     //add event listener for 'cmp:show' and callback
     dl.addEventListener('cmp:show', (evt) => {
         if (evt.eventInfo?.path) {
             //trigger Launch Rule and pass event
             console.debug('cmp:show event: ' + evt.eventInfo.path);
             const event = {
                 //include the path of the component that triggered the event
                 path: evt.eventInfo.path,
                 //get the state of the component that triggered the event
                 component: window.adobeDataLayer.getState(evt.eventInfo.path),
             };

             //Trigger the Launch Rule, passing in the new 'event' object
             // the 'event' obj can now be referenced by the reserved name 'event' by other Launch data elements
             // i.e 'event.component['someKey']'
             trigger(event);
         }
     });
 });
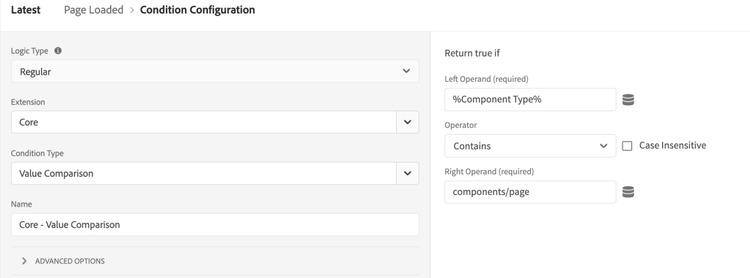
For conditions add a value comparison where we check for the left operand for %Component Type% and for the right operand for components/page. The operator is contains.
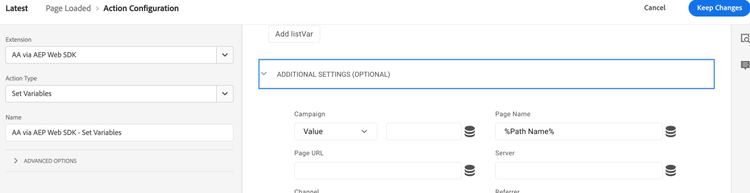
Lastly as for actions we are leveraging the AA via AEP Web SDK extension and select Set Variables and provide the following settings:
Additional settings > Page Name = %Path Name%.
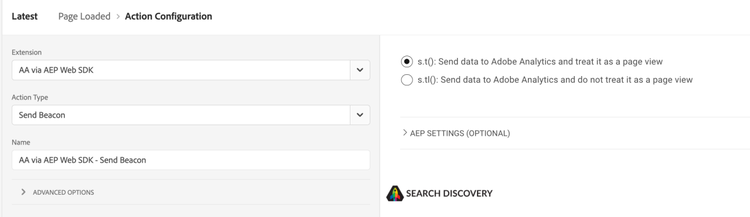
Secondly add a Send Beacon action and select AA via AEP Web SDK and Send Beacon as the action type.
Rule: Core Component Clicked
Create a new rule and name it Core Component Clicked. For events create a custom code event and add the following code:
/* jshint esversion: 11 */ // allow optional chaining

 //set the namespace to avoid a potential race condition
 window.adobeDataLayer = window.adobeDataLayer || [];
 //push the event listener for cmp:click into the data layer
 window.adobeDataLayer.push(function (dl) {
     //add event listener for 'cmp:click' and trigger the event for the data elements
     dl.addEventListener('cmp:click', (evt) => {
         if (evt.eventInfo?.path) {
             const path = evt.eventInfo.path;
             console.debug('cmp:click event: ' + path);

         //Trigger the Launch Rule, passing in the new 'event' object
         // the 'event' obj can now be referenced by the reserved name 'event' by other Launch data elements
         // i.e 'event.component['someKey']'
         trigger({ path, component: adobeDataLayer.getState(path) });
         }
     });
 });
As for actions create first a Set Variables action with the following settings:
Props:
Prop1: %Component Type%
Prop2: %Component Title%

Secondly add another action and select AA via AEP Web SDK and Send Beacon as the action type. Make sure you select Send data to Adobe Analytics and do not treat it as a page view and as Link type select Custom Link and Link Name set as %Component Type% - %Component Title%: Clicked.
Now thats it. Build it and ship it!
Consent handling
Once you have implemented the tags script on your page you will notice that nothing happens.
If you have installed the AEP Debugger extension for Chrome you will see that the rules we have defined are firing but also a console warning is present that says No consent has been given. No data will be sent to the datastream.

And this is actually the correct behaviour, as we have not given consent, but have defined within the WebSDK extension that all events require consent and that they will be staged in memory until consent is given.
So how do I give consent, you may ask. All we need to do is fire a javascript function that sets the consent.
Code

alloy('setConsent', {
  consent: [
    {
      standard: 'Adobe',
      version: '1.0',
      value: {
        general: 'in',
      },
    },
  ],
});
This will send the consent to the datastream and store the consent and any eVars in the cookies. This means that if you are using a consent tool like OneTrust, you can simply call this function once the user has given consent and the data will be sent to the datastream.
Ideally you would also do this via a rule. This rule should register itself as a callback to the consent tool and then fire the setConsent function once consent has been given. Alternatively, you can look for a specific cookie set by the consent tool and then fire the setConsent function.
We know that setting up Analytics properly can be a demanding task. Reach out if you need help.